Sunday, October 31, 2010

Friday, October 29, 2010

Sunday, October 24, 2010

Thursday, October 21, 2010

Recipe Rursday: Hot Chili-infused Oil

At one point in October we had accumulated 40+ hot chili peppers from our CSA. Since they were too hot to eat fresh (for me), and throwing one in a stir fry meant I couldn't eat the stir fry, we needed to find a way to use them, while regulating the heat in the final product.
10/10/10
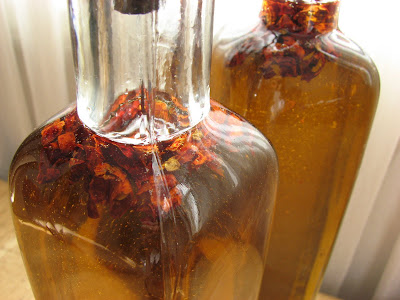
The solution was simple (and a huge success): Chili-infused Oil. Here's what I learned from the reading up on the process:
  1. Don't use chilies that haven't been completely dried out. I dried the chilies on a paper towel in a sunny window. On the day we/Chris made the oil, he left one of the larger chilies out of the batch, because it still had a fleshy shape and wasn't fully shrunken and shriveled like the ones above. I had read that if the chilies still have moisture (and are closer to fresh than dried), the oil will turn cloudy.
  2. There are a lot of different opinions on what kind of oil to use. We used the olive oil that we buy in bulk, just to save money. Since the chilies overpower any delicate flavor you'd get from good olive oil, the idea is that you should buy cheaper, flavorless oil--like a salad or canola oil. I used almost all of our canola oil for my latest popcorn obsession.
  3. Use gloves. Because I have the constitution of a day-old moth, and am allergic to everything, Chris gallantly volunteered to put the whole thing together, including removing the tops/stems off of the peppers and chopping them all. Even he-who-is-invincible used plastic gloves, given the number of peppers being used. Though there are other ways of getting hurt by this project...
  4. Heat the oil to a shimmer, just before smoke point (don't let the oil smoke). Then add the chopped chilies and remove the pot from the heat. I read and took note of the fact that if water gets into the chili oil while it's hot (immediate steam), or if the oil gets so hot that it smokes and turns to vapor, you will spend the next hour choking from vaporized pepper oil in your throat. The combination of water and oil releases the capsaicin from the pepper and sends it out in a vicious cloud of 'I will make you miserable,' so don't risk it.
  5. Let the chili oil cool to room temperature (maybe even overnight). At this point, you can pulse the oil in a food processor (we chose not to), strain out all of the peppers, or leave all or some of them in the oil when bottling. Chris strained out some of them, not all, and left a few in the top of each bottle. The bottles were cheap at Kmart, but they're also at Bed Bath & Beyond, and the like. We gave one bottle of oil to our friend Bill and kept one for ourselves, not knowing how quickly or if we'd get through the bottle.
Over the next few days, the oil deepened in its red-color and we use it all the time. Ideas: Brush it on pita triangles before baking them into spicy chips, start stir frys with it, add it to roasting potatoes/vegetables, and pop popcorn with this thing of beauty. The popcorn is so good. But I filled the kitchen with the smoke that makes you choke, so I'll use less next time. Huge success nonetheless.
10/17/10.

Monday, October 18, 2010

Inspired by the Pumpkin

10/11/10. Never gets old...E and Taylor joined us for pumpkin decorating. Taylor rooted us on (he's recovering from a cold). Of course, Chris painted the goofy one.
An inspirational mojo dance?
E's pumpkin, inspired by her new kitten, Roshi (here).
Maybe our last beautiful sunny day, and a perfect day to play with paints and pumpkins and good friends.

Saturday, October 16, 2010

With or without...it's all good.

9/11/10.
Chris shaves and loses 20 years, but looks distinguished with his grays. Lucky bastard.
10/9/10.
We're both 9 years lucky to have each other this month. When do we retire and move to the Caribbean?

Thursday, October 14, 2010

Recipe Rursday: Fall Squash Dishes

Buttercup Squash 9/12/10.

Not a misprint...this is called Buttercup Squash and it showed up last month in our CSA. I imagine you could use any squash for this very simple recipe: pumpkin, butternut squash, or whatever you have in the house. The first version of this Squash & Beans recipe was inspired by Chris' mom who sent us home with an incredibly tasty White Beans & Spanish Pumpkin dish. It's basically a one-off from Chris' Rice & Beans (with his family's sofrito), but cooked longer to fully cook the squash.
9/12/10.
Rice & Beans with Squash
  • Sofrito or Goya's Racaito
  • Goya Tomato Sauce (Salsa tomato)
  • Red or White Beans
  • Squash (Buttercup, Green pumpkin, Butternut, etc)
  • Green Peppers (optional)
Start with sofrito or store-bought Racaito (see notes on sofrito here) in the sauce pan, add the tomato sauce. Add the beans and pumpkin or squash (and peppers, if you've got 'em) along with a cup of broth and simmer for 20-30 minutes, until squash is tender. Season with S&P, and possibly 2 T of cumin, 1 tsp. of Adobo, and a half a tsp. of red pepper flakes (all optional). Serve over rice.
Butternut Squash, 10/10/10.

Butternut Squash can be so large they're difficult to fully use in one dish. And I've been determined this year to not let the food that comes in our CSA go to waste. I am challenged by the size and sweetness of squash--butternut squash in particular. I have some frozen (already cut in cubes) in the freezer, to throw into bean dishes like the one above. The rest went to soup, and we still have one sitting on the counter.
An unexpected combination--leeks and squash, but I recently found a leek and pumpkin soup recipe that was easy enough to tweak. I love leeks. And now that I know how to clean them with water baths, I don't mind prepping them for soup. (My first time with leeks led to an amazing soup -- Leek & Chickpea Soup-- and some learnin' about leek cleaning).

Leek and Butternut Squash Soup
This recipe is a combination of 4 others I read before building one for the ingredients in our cupboard. Inspiration: Pumpkin-Leek Soup by Real Simple, followed by Food & Wine's Butternut Squash and Leek Soup.
  • 1 T olive oil
  • 2 celery stalks chopped
  • 1-2 cloves of garlic
  • 5-6 leeks, thinly sliced
  • 1 1/2 lbs of butternut squash peeled and cut into small (3/4"-1/2") cubes
  • 4 cups of broth
  • thyme (or rosemary)
  • sour cream (optional)
Heat oil. Add the leeks, stir often and sautee for 5 min. Add celery, and garlic, cook for a few more minutes. Add the squash and broth.

Bring to a boil, then reduce to a simmer and cook until squash is tender, about 25 minutes. Season with salt & pepper. Use a hand-held mixer or pour portions of the soup into a blender, to puree until smooth. Add 1/4 cup of sour cream just before serving, for creaminess.

Garnish with thyme or rosemary. Or, garnish each bowl with a teaspoon of sour cream. Now that's a bright soup!

Thursday, October 7, 2010

Recipe Rursday: Radishes and Radish Greens

10/5/10.

Trying something a little different this week...in our CSA we received a nice bunch of radishes. I'm not a huge fan of raw radishes, though if hidden in an avocado/sprouts sandwich, I might not complain. The greens (tops of the radishes) looked really good and Chris reported that they're edible, if we could figure out how to prepare them.

Tonight I tried Food & Wine's Roasted Radishes and Radish Greens (below). The combination of the sweet roasted radishes (something like mellow sweet potatoes) with the bitter greens worked really really well. I sliced the radishes thinly, which made them more like crisps or chips. And the final dish looked nothing like Food & Wine's, but I'd make it again in a flash. At least, any time I am given radishes.

Ingredients
  1. 3 bunches small radishes with greens attached
  2. 2 tablespoons extra-virgin olive oil
  3. Salt and freshly ground pepper
  4. 2 tablespoons unsalted butter (skipped this step)
  5. 2 tablespoons fresh lemon juice (used a splash of lime juice actually, but the cast iron skillet was so hot, it basically disintegrated as soon as it hit the pan).
Directions
  1. Preheat the oven to 500°. Trim the radishes and wash the greens; pat dry.
  2. In a large ovenproof skillet, heat the oil until shimmering. Add the radishes, season with salt and pepper and cook over high heat, stirring occasionally, until lightly browned in spots, about 2 minutes. Transfer the skillet to the oven and roast the radishes for 15 minutes, until crisp-tender.
  3. Return the skillet to the burner and stir in the butter to coat the radishes. Add the radish greens and cook over moderate heat until they are wilted, about 2 minutes. Add the lemon juice and season with salt. Serve the radishes right away.

Tuesday, October 5, 2010

Are we now art collectors?

A few months ago, my friend Anne told me about the art culture in Omaha, and how collectors (which neither of us are) see their purchases as both financial investments and aesthetic investments that impact the day-to-day (because they only buy artwork they enjoy).

We purchased our first piece of artwork from my co-worker a few months back (gorgeous!) and we were lucky enough to take home our second this past weekend. Given our jobs (especially my working in the non-profit sector) and aspirations, we'll never be rolling in dough; but how great is it that we have stumbled on two opportunities to bring interesting and affordable artwork into our home. This awesome art door will be up on our wall as soon as we get the rigging. So glad we could support a talented teen artist (we have two of her screen-printed shirts) at a fundraiser for teen artists that happens to be my previous place of employment.

They're doing impactful work that empowers teens who unfairly carry burdens that most of us will never know. I feel fortunate that we can support an organization that gave me so much during my time there.

Monday, October 4, 2010

Garden on the Deck: September Activity

Kale, 9/11/10.

9/17/10 -- Most people are putting their gardens to bed for the fall and winter. My tomatoes still haven't been harvested, I've got flowers and potential peppers all over my pepper plants, and two more eggplants trying to make a go at it. And all of a sudden, my stunted strawberry plant has doubled in size. Aren't they spring fruits? My garden is on it's own calendar this year. Above, the kale keeps plugging along. I have no idea when it's ready to eat.

September Activity in the Garden:
  1. Kale (above)
  2. More basil...because I finally found out how to harvest it: cut just above the bottom pair of leaves on each stem.
  3. Little hot red peppers
  4. Tomatoes
  5. Lettuce
  6. Carrots (photos TBA)
More Basil, 9/7/10.
This is probably the 3rd harvest from our basil plants. Our 4th harvest was on 9/28/10. Amazing. There will be a bounty of pesto through the winter.
Red pepper, 9/11/10.
Out of nowhere, this pepper (above) shows up, first green, then cherry red. When we finally picked it, I gave Chris a sliver to test for hotness. King of hotness said it was pretty hot. I took a 10th of the size of his sliver and coughed for the next 10 minutes. Then I promptly threw it into a freezer bag and tossed it into the freezer until I know what to do with it.
9/11/10.
Tomatoes are still green, but there are 5 that are far enough along they may become edible.

9/11/10.
Our last batch of lettuce. The squirrels have dug up the others, and this one (my favorite kind) gave us one last round for a nice salad.
We make a lot of salad. I love it.