Showing posts with label CSA Farm Share. Show all posts

Thursday, December 9, 2010

Recipe Rursday: Homemade Hot Sauce

We go through a lot of hot sauce in our house. On oven nachos, fish tacos, huevos rancheros, and even rice and beans. And with the number of hot peppers growing in the deck garden, and that came in our CSA farm share, it was only a matter of time before we started making our own hot sauce. We had a number of hot peppers go to waste this year and we will not make that mistake again. The hot chilii-infused oil (recipe here) was a great way to use up peppers, and the oil will last for quite a while. But hot sauce doesn't require that you dry out the chilis, and the process was much simpler.
Garlicky Red Chili Hot Sauce (from The New York Times)
  • 4 hot red or orange chili peppers, such as habañero
  • 2 red bell peppers ( 3/4 pound), roughly chopped
  • 5 garlic cloves, roughly chopped
  • 3/4 cup distilled white vinegar
  • 1/2 teaspoon kosher salt.

1. Wearing rubber or latex gloves, roughly chop the chilies. Combine all ingredients in a small pot over medium-high heat. Once mixture is simmering, reduce heat to low, cover and continue to simmer until peppers are tender, 7 to 10 minutes. Do not inhale vapors; they will sting.

2. Transfer mixture to a blender and purée. Pour into a medium jar and allow to cool uncovered. Cover tightly and refrigerate for three days. Keep stored in refrigerator; sauce will last for several weeks or months. Yield: 2 cups.

10/31/10.

Notes: This was Chris' project (whew), and he bottled our batch in the cleaned-out distilled vinegar bottle because of its screw-on cap. The sauce is bright orange and a little thick/chunky. Only thing I'd change for the next batch is to turn up the heat. It's hot sauce damn it! If it's really really hot, you can hold back and only use a little bit. Since our first batch was on the more mild side, we're almost through the bottle.

Monday, November 15, 2010

Planting Garlic for Next June

Last week, I put the garden to bed and this weekend helped my friend Elizabeth do the same. For mine, I only had to pull out the bigger plants. I bunched up the empty containers a corner on the deck and will cover them with a tarp for the winter, so the weight of the snow doesn't compact the soil. For Elizabeth's plot at her community garden (see below), we pulled up anything that wasn't green, bagged it, and covered the bed with leaves.
But, before both gardens were put to bed, we planted garlic...the final experiment for the 2010 garden. Garlic takes quite a while to grow. Planting cloves in early November means I'll hopefully have full heads of garlic to harvest in June or July of next year. I saved the largest cloves from our last head of csa garlic and dried them out in a paper bag, for at least two months. I had been advised to plant at the end of October. We shall see.
Planting garlic, an Urban Chicken workshop at SCLT, and a trip to the batting cages. All outdoors this weekend, and such a great end to the growing season.

Thursday, November 4, 2010

Recipe Rursday: Green Bean Casserole in a skillet

For our 2nd year with a CSA (this year with Four Friends Farms), I am once again very happy; buying a farm share was healthy, socially responsible, sustainable, and it challenged us to try new recipes and learn more about fresh food. We will be CSA-ing as long as we can afford it. This recipe, for example, was inspired by the fact that we had two big bags of fresh green beans...'fresh' as in 'picked a few days ago.' Alton Brown promised the "best recipe," so we gave it a try. Of course, with a few tweaks.
10/17/10.

Alton Brown's Best Ever Green Bean Casserole: My notes: The green beans need to be cooked a minute or two longer and we used milk instead of cream, which means that it needed to be cooked down a bit longer once in the cast iron skillet, as well. Also, if the green beans are salted (you'll know when tasting them before blanching), don't over salt the mushrooms or the final dish.

For the topping:
  • 2 medium onions, thinly sliced
  • 1/4 cup all-purpose flour
  • 2 tablespoons panko bread crumbs
  • 1 teaspoon kosher salt
  • Nonstick cooking spray

For beans and sauce:

  • 2 tablespoons plus 1 teaspoon kosher salt, divided
  • 1 pound fresh green beans, rinsed, trimmed and halved
  • 2 tablespoons unsalted butter
  • 12 ounces mushrooms, trimmed and cut into 1/2-inch pieces
  • 1/2 teaspoon freshly ground black pepper
  • 2 cloves garlic, minced
  • 1/4 teaspoon freshly ground nutmeg
  • 2 tablespoons all-purpose flour
  • 1 cup chicken broth (veggie broth - also can be salty)
  • 1 cup half-and-half (or milk)

Preheat the oven to 475 degrees F. Combine the onions, flour, panko and salt in a large mixing bowl and toss to combine. Coat a sheet pan with nonstick cooking spray and evenly spread the onions on the pan. Place the pan on the middle rack of the oven and bake until golden brown, approximately 30 minutes. Toss the onions 2 to 3 times during cooking. (beware of blackening) Once done, remove from the oven and set aside until ready to use. Turn the oven down to 400 degrees F.

While the onions are cooking, prepare the beans. Bring a gallon of water and 2 tablespoons of salt to a boil in an 8-quart saucepan. Add the beans and blanch for 5 minutes. (but taste them, they may need a minute or two longer, if they're large) Drain in a colander and immediately plunge the beans into a large bowl of ice water to stop the cooking. Drain and set aside.

Melt the butter in a 12-inch cast iron skillet set over medium-high heat. Add the mushrooms, 1 teaspoon salt and pepper and cook, stirring occasionally, until the mushrooms begin to give up some of their liquid, approximately 4 to 5 minutes. Add the garlic and nutmeg and continue to cook for another 1 to 2 minutes. Sprinkle the flour over the mixture and stir to combine. Cook for 1 minute. Add the broth and simmer for 1 minute. Decrease the heat to medium-low and add the half-and-half. Cook until the mixture thickens, stirring occasionally, approximately 6 to 8 minutes. (If using milk reduce down longer)

Remove from the heat and stir in 1/4 of the onions and all of the green beans. Top with the remaining onions. Place into the oven and bake until bubbly, approximately 15 minutes. Remove and serve immediately.

Thursday, October 21, 2010

Recipe Rursday: Hot Chili-infused Oil

At one point in October we had accumulated 40+ hot chili peppers from our CSA. Since they were too hot to eat fresh (for me), and throwing one in a stir fry meant I couldn't eat the stir fry, we needed to find a way to use them, while regulating the heat in the final product.
10/10/10
The solution was simple (and a huge success): Chili-infused Oil. Here's what I learned from the reading up on the process:
  1. Don't use chilies that haven't been completely dried out. I dried the chilies on a paper towel in a sunny window. On the day we/Chris made the oil, he left one of the larger chilies out of the batch, because it still had a fleshy shape and wasn't fully shrunken and shriveled like the ones above. I had read that if the chilies still have moisture (and are closer to fresh than dried), the oil will turn cloudy.
  2. There are a lot of different opinions on what kind of oil to use. We used the olive oil that we buy in bulk, just to save money. Since the chilies overpower any delicate flavor you'd get from good olive oil, the idea is that you should buy cheaper, flavorless oil--like a salad or canola oil. I used almost all of our canola oil for my latest popcorn obsession.
  3. Use gloves. Because I have the constitution of a day-old moth, and am allergic to everything, Chris gallantly volunteered to put the whole thing together, including removing the tops/stems off of the peppers and chopping them all. Even he-who-is-invincible used plastic gloves, given the number of peppers being used. Though there are other ways of getting hurt by this project...
  4. Heat the oil to a shimmer, just before smoke point (don't let the oil smoke). Then add the chopped chilies and remove the pot from the heat. I read and took note of the fact that if water gets into the chili oil while it's hot (immediate steam), or if the oil gets so hot that it smokes and turns to vapor, you will spend the next hour choking from vaporized pepper oil in your throat. The combination of water and oil releases the capsaicin from the pepper and sends it out in a vicious cloud of 'I will make you miserable,' so don't risk it.
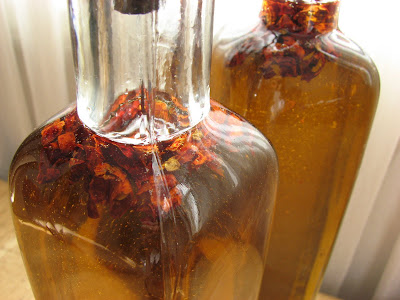
  5. Let the chili oil cool to room temperature (maybe even overnight). At this point, you can pulse the oil in a food processor (we chose not to), strain out all of the peppers, or leave all or some of them in the oil when bottling. Chris strained out some of them, not all, and left a few in the top of each bottle. The bottles were cheap at Kmart, but they're also at Bed Bath & Beyond, and the like. We gave one bottle of oil to our friend Bill and kept one for ourselves, not knowing how quickly or if we'd get through the bottle.
Over the next few days, the oil deepened in its red-color and we use it all the time. Ideas: Brush it on pita triangles before baking them into spicy chips, start stir frys with it, add it to roasting potatoes/vegetables, and pop popcorn with this thing of beauty. The popcorn is so good. But I filled the kitchen with the smoke that makes you choke, so I'll use less next time. Huge success nonetheless.
10/17/10.

Thursday, October 14, 2010

Recipe Rursday: Fall Squash Dishes

Buttercup Squash 9/12/10.

Not a misprint...this is called Buttercup Squash and it showed up last month in our CSA. I imagine you could use any squash for this very simple recipe: pumpkin, butternut squash, or whatever you have in the house. The first version of this Squash & Beans recipe was inspired by Chris' mom who sent us home with an incredibly tasty White Beans & Spanish Pumpkin dish. It's basically a one-off from Chris' Rice & Beans (with his family's sofrito), but cooked longer to fully cook the squash.
9/12/10.
Rice & Beans with Squash
  • Sofrito or Goya's Racaito
  • Goya Tomato Sauce (Salsa tomato)
  • Red or White Beans
  • Squash (Buttercup, Green pumpkin, Butternut, etc)
  • Green Peppers (optional)
Start with sofrito or store-bought Racaito (see notes on sofrito here) in the sauce pan, add the tomato sauce. Add the beans and pumpkin or squash (and peppers, if you've got 'em) along with a cup of broth and simmer for 20-30 minutes, until squash is tender. Season with S&P, and possibly 2 T of cumin, 1 tsp. of Adobo, and a half a tsp. of red pepper flakes (all optional). Serve over rice.
Butternut Squash, 10/10/10.

Butternut Squash can be so large they're difficult to fully use in one dish. And I've been determined this year to not let the food that comes in our CSA go to waste. I am challenged by the size and sweetness of squash--butternut squash in particular. I have some frozen (already cut in cubes) in the freezer, to throw into bean dishes like the one above. The rest went to soup, and we still have one sitting on the counter.
An unexpected combination--leeks and squash, but I recently found a leek and pumpkin soup recipe that was easy enough to tweak. I love leeks. And now that I know how to clean them with water baths, I don't mind prepping them for soup. (My first time with leeks led to an amazing soup -- Leek & Chickpea Soup-- and some learnin' about leek cleaning).

Leek and Butternut Squash Soup
This recipe is a combination of 4 others I read before building one for the ingredients in our cupboard. Inspiration: Pumpkin-Leek Soup by Real Simple, followed by Food & Wine's Butternut Squash and Leek Soup.
  • 1 T olive oil
  • 2 celery stalks chopped
  • 1-2 cloves of garlic
  • 5-6 leeks, thinly sliced
  • 1 1/2 lbs of butternut squash peeled and cut into small (3/4"-1/2") cubes
  • 4 cups of broth
  • thyme (or rosemary)
  • sour cream (optional)
Heat oil. Add the leeks, stir often and sautee for 5 min. Add celery, and garlic, cook for a few more minutes. Add the squash and broth.

Bring to a boil, then reduce to a simmer and cook until squash is tender, about 25 minutes. Season with salt & pepper. Use a hand-held mixer or pour portions of the soup into a blender, to puree until smooth. Add 1/4 cup of sour cream just before serving, for creaminess.

Garnish with thyme or rosemary. Or, garnish each bowl with a teaspoon of sour cream. Now that's a bright soup!

Thursday, October 7, 2010

Recipe Rursday: Radishes and Radish Greens

10/5/10.

Trying something a little different this week...in our CSA we received a nice bunch of radishes. I'm not a huge fan of raw radishes, though if hidden in an avocado/sprouts sandwich, I might not complain. The greens (tops of the radishes) looked really good and Chris reported that they're edible, if we could figure out how to prepare them.

Tonight I tried Food & Wine's Roasted Radishes and Radish Greens (below). The combination of the sweet roasted radishes (something like mellow sweet potatoes) with the bitter greens worked really really well. I sliced the radishes thinly, which made them more like crisps or chips. And the final dish looked nothing like Food & Wine's, but I'd make it again in a flash. At least, any time I am given radishes.

Ingredients
  1. 3 bunches small radishes with greens attached
  2. 2 tablespoons extra-virgin olive oil
  3. Salt and freshly ground pepper
  4. 2 tablespoons unsalted butter (skipped this step)
  5. 2 tablespoons fresh lemon juice (used a splash of lime juice actually, but the cast iron skillet was so hot, it basically disintegrated as soon as it hit the pan).
Directions
  1. Preheat the oven to 500°. Trim the radishes and wash the greens; pat dry.
  2. In a large ovenproof skillet, heat the oil until shimmering. Add the radishes, season with salt and pepper and cook over high heat, stirring occasionally, until lightly browned in spots, about 2 minutes. Transfer the skillet to the oven and roast the radishes for 15 minutes, until crisp-tender.
  3. Return the skillet to the burner and stir in the butter to coat the radishes. Add the radish greens and cook over moderate heat until they are wilted, about 2 minutes. Add the lemon juice and season with salt. Serve the radishes right away.

Tuesday, September 7, 2010

Thursday, August 12, 2010

Recipe Rursday: Pickling Cucumbers (or Zucchini)

Pickled Cucumbers, 8/8/10.

My co-worker used to work at Smoke & Pickles in Westport, MA, and raves about all the things you can pickle. And for some reason, 1/2 the staff where I work says pickled green beans in a bloody mary is to die for (mental note: check that out some time soon). Since the extra zucchinis from our CSA have been piling up, I thought maybe I'd try pickling them.
Cukes from our CSA, 8/8/10.

So when my friend at work sent me a pickled zucchini recipe, I gave it a go. Except I didn't have zucchinis. I had CUCUMBERS. You'd think I would be able to tell the difference... These pickled cucumbers (yes, just pickles) are wonderfully spicy and sweet, and deserving of a higher status than that of the lowly condiment.

Zucchini Pickles (or my version: Cucumber Pickles)
Cooking Light August 2010

Combine 4 cups 1/8-inch zucchini slices, 1 cup slivered sweet onion, and 3 thinly sliced garlic cloves in a glass bowl. Bring 1 cup white vinegar, 1/2 sugar, 3/4 teaspoon crushed red pepper, 1 teaspoon mustard seeds, and 3/4 teaspoon kosher salt to a boil; pour over zucchini mixture. Cover and chill 24 hours.

Friday, July 9, 2010

CSA Share: Weeks 3 & 4

6/29/10.
Weeks 3 & 4 of our CSA share through Four Friends Farm. The produce has been fresh, clean, varied and tasty as all getout. Even the variation between these two weeks was a great change of pace. Oh, and kale...makes really really good pesto. I'm a believer. Above: Green beans, potatoes, oregano, green onions, beets, greens/pea shoots, and fresh eggs. Below: Kale (2 kinds), basil (2-3 kinds), green beans, cukes, patty pan squash, and currants.
7/6/10.

Wednesday, June 23, 2010

New CSA Share: Four Friends Farm

CSA Week One, 6/15/10.

We're trying a new CSA this year, Four Friends Farm, which we pick-up each Tuesday down in Cranston. We purchased a single share and a dozen eggs every other week. Already, I feel better from eating all of these greens. The red lettuce (Lollo Rossa?) and snap peas have led to interesting salads. Officially...we have summer.
Green Egg, 6/15/10.

Chris is psyched about the new multi-colored, organic eggs (a green egg, above) from free range chickens running around in Johnston, RI. According to the Boston Globe (those crazy chicken-egg experts), the varying colors are due to a difference in genetics among different types of chickens. Araucanas tend to lay green & blue eggs. These eggs are possibly from Araucanas, Black Australorps, Rhode Island Reds and Bantams.
CSA Week Two, 6/22/10.

New additions this week included patty pan squash (above) and Chinese broccoli (below). I need to read up on patty pan squash. If I can't roast it, not sure what to do yet...
Snap peas & Chinese broccoli.

Thursday, November 19, 2009

Recipe Rursday: Sweet Potato Spaghetti

Spaghetts 11/11/09.

With our very last item from Scratch Farm's CSA, a lone sweet potato, we made this odd little dish -- Sweet Potato Spaghetti. We will definitely make this again. The only thing I'd change is to add more rosemary, which adds a nice compliment to the sweet potatoes. I held back, and without the garlic, it would've been bland. But, another winner from Real Simple.

Spaghetti with Sweet Potato and Ricotta (Real Simple, October 2009)
  • 12 ounces spaghetti (3/4 box)
  • 2 tablespoons olive oil
  • 2 small sweet potatoes (about 1 pound), cut into 1/2-inch pieces (we used one large)
  • kosher salt and black pepper
  • 2 shallots, sliced (skipped the shallots, used minced garlic instead)
  • 1 tablespoon chopped fresh rosemary (or dried - I used 1tsp. to avoid overdoing the rosemary, but next time I'd amp it up to 1T)
  • 1/4 cup grated Parmesan (1 ounce)
  • 1/3 cup ricotta
Cook the pasta according to the package directions. Reserve 1⁄2 cup of the cooking water. Drain the pasta and return it to the pot.

Meanwhile, heat the oil in a large nonstick skillet over medium heat. Add the potatoes, 3⁄4 teaspoon salt, and 1⁄4 teaspoon pepper and cook, covered, stirring occasionally, for 10 minutes. Add the shallots (garlic) and rosemary and cook, uncovered, stirring occasionally, until the potatoes are tender, 3 to 5 minutes.

Toss the pasta with the potato mixture, Parmesan, and the reserved cooking water. Dollop with the ricotta before serving.

** For more recipes, check out the RedPepperFlakes Recipe Archives.

Saturday, September 19, 2009

CSA Week 13 & 14

Rasberries, 9/14/09.
CSA Week 14 (below): corn, butternut squash, carrots, peppers, eggplant (so cute!), cooking greens mix (tatsoi, napa cabbage, red mustard), beets, and Rasberries.
Week 13 (below): cooking greens mix, garlic, onions, herbs, eggplant, peppers, summer squash.

Monday, September 7, 2009

Cabbage Breakthrough: Sesame Slaw

Sesame Slaw, taken 8/24/09.

I had almost given up on cabbage. Then, on a spontaneous evening out at Julian's restaurant in the West End, we ordered an appetizer that came with a side of scrumptious Sesame Slaw. It didn't have a name, exactly, and it wasn't mentioned on the menu, but I recognized the dressing as sesame oil based. That night, I looked up a Sesame Slaw recipe on Epicurious, and discovered the following breakthrough: we can make cabbage taste delicious.

Sesame Coleslaw (from Epicurious/Bon Appetit 1998): I divided the recipe in 1/2 and the final amount was perfect for dinner (for 2) and again, for a pot-luck side at a BBQ.
  • 6 C very thinly sliced green cabbage (about 1-pound head) (3 C)
  • 3 C shredded peeled carrots (1/2 C)
  • 2 C fresh spinach leaves, trimmed, thinly sliced - or mixed salad greens (1/2 C)
  • 1/2 cup plus 1 tablespoon rice vinegar (1/4 C)
  • 1/4 cup oriental sesame oil (1/8 C)
  • 1/4 cup sugar (1/8 C)
  • 3 tablespoons minced peeled fresh ginger (1/2 T)
  • 2 teaspoons soy sauce (1 T)
  • 1 1/2 tablespoons sesame seeds, toasted - forgot to toast these (shake on, at end).

Combine cabbage, carrots and sliced spinach (I used dark salad greens) in large bowl.

Whisk vinegar, oil, sugar, ginger and soy sauce in medium bowl until sugar dissolves. Season with salt and pepper. (Cabbage mixture and dressing can be made 1 day ahead. Cover separately; chill.)

Toss cabbage mixture with dressing. Season coleslaw with salt and pepper...Sprinkle with sesame seeds.

Spicy Veggie Links & Sesame Slaw, 8/24/09.
Sesame Slaw (2nd Version), for a Labor Day BBQ, taken 9/7/09.

** For more recipes: RedPepperFlakes Recipe Archives.

Tuesday, September 1, 2009

CSA: Week 12

8/31/09.

CSA Week 12 from Scratch Farm: tomatoes, sweet peppers, salad mix, cooking greens mix, raspberries, red cabbage, and basil.

Friday, August 28, 2009

CSA Recipe: Farm Veggie Sautee & White Fish (5 of 5)

I am missing the grill. A friend confessed to me yesterday that she was ready for summer to be over already and I think I'm ready as well. Isn't the Fall a perfect grilling season? We don't spend much time on the deck in this heat and humidity.

Earlier this summer, we were grilling a few nights a week. Above is a white fish (here, it was Cod), grilled on the back deck and served it with a side of veggies from our CSA. Nothing too exciting, but any successful use of chard, for us, is a major triumph.

Veggie Saute: Saute white onion and garlic until soft, add the greens (swiss chard, stalks removed) and chopped squash, and when soft, add the chopped tomato (for the last few minutes). + salt & pepper.

Thursday, August 27, 2009

CSA Recipe Week (4 of 5): Chickpea Stew

I'm using this CSA Recipe Week to post all the recipes that I skipped over these last few months, from laziness or because my new job involves so much work on the computer (all day!) that I can't bare to look at the blog on a week-day evening. Not complaining, just explaining.

Back in July, we made this Chickpea Stew, partially to use up the remaining garlic scapes from our CSA. It's amazing to think that I had never even seen a garlic scape or eaten a beet prior to this summer. I had to look them up to see what people do with them. Turns out I love them both. Chris & I love chickpeas, so this was an easy stew to throw together.

Chickpea Stew: Sautee garlic (or garlic scapes), onions, & mushrooms, add canned (whole) tomatoes, chickpeas, and salt & pepper. Simmer for a 1/2 hour or longer, and serve.

Wednesday, August 26, 2009

CSA Recipe Week (3 of 5): Pesto Veggie Pizza

We were overflowing with tomatoes this week - from our CSA and from the garden on the deck. And since I've insisted that we stop buying wheat dough for our pizzas (because we can't get them to crisp up as well as the white flour dough), our pizzas keep getting better and better. This one may not have topped the Zucchini, Basil & Goat Cheese pizza miracle, but it was incredibly tasty and fresh.

Pesto Veggie Pizza: Pesto base (pesto recipe from Joy of Cooking, in a past post), topped with garlic & shallots from the CSA, sungella tomatoes from the garden & red heirlooms from the CSA, shredded cheese (Italian mix), and fresh CSA basil. Talk about a fresh garden veggie pizza.

Monday, August 24, 2009

CSA: Week 11

CSA Week 11, taken 8/24/09.
Potatoes, zucchini, squash, a bag of greens & chard, tomatoes, a pepper, raspberries, and a basil tree...oh my! Scratch Farm has been very very good to us this week.

CSA Recipe Week (2 of 5): Beans & Veggies with Quinoa

We've started to buy quinoa (what is Quinoa?) at our local Whole Foods because, if you can believe it, buying quinoa at Whole Foods (in the bulk containers) saves money. Boxes of quinoa in the regular grocery store tend to cost much more.

This dish was something that Chris threw together late in the week.
Beans & Veggies with Quinoa: Prepare the quinoa based on your box instructions, or use online guidelines for cooking time. Chris prepared his black beans + sofrito (a homemade family recipe) and added sauteed mushrooms, chard from the CSA (chopped, with stems removed), and chopped roasted red peppers. The results, a hearty, but not too heavy, feast.

Sunday, August 23, 2009

CSA Recipe Week (1 of 5): Zucchini & Onion Bread

Our CSA share has included 2 or 3 squash or zucchini in past weeks, and I have been wanting to make bread since our friend Bill mentioned his bread-making obsession. I don't bake very often, because I'm not good with the precision it can require, but this bread was easy.
The recipe came from The Market Fresh Cookbook--a Reader's Digest book (on sale at BJs), that categorizes the recipes by summer/market vegetable. Excellent for CSA veggies. The staff at Street Sights seemed to enjoy the loaf (below), though I agree with our staff foodie that in the end, it wasn't terribly flavorful. Next time: I'll use more salt, since it's a savory bread.
Onion Zucchini Bread
  • 3 C flour
  • 3/4 C chopped onion
  • 1/2 C grated Parm (6 T set aside)
  • 5 tsp. baking powder
  • 1 tsp. salt
  • 1/2 tsp. baking soda
  • 1 C buttermilk (I used 3/4 C of 2% milk)
  • 1/3 C vegetable oil
  • 2 eggs, lightly beaten
  • 3/4 C finely shredded zucchini
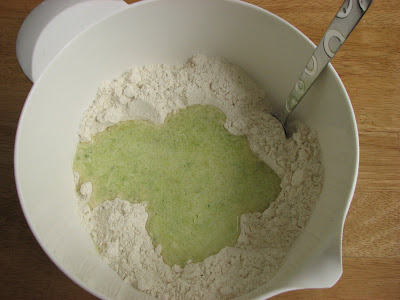
Preheat oven to 350F. Combine the first 6 ingredients (but only 6T of parm. cheese) in a large bowl. In a small bowl, combine the last 4. Stir the latter into the former, until just blended.

Spoon batter into a greased baking pan & cover with remaining parm. Bake for 40 min, or until a toothpick inserted near the center comes out clean. Let rest on rack for 10 min, be fore removing.